HTML,CSS,JavaScriptで作るtodoリスト(2)
今回はタスク追加機能の作成をメモしていきます。
前回の記事を見ていない方はこちらから
yuu104.hatenablog.com
タスク追加の流れは以下のようになります。
1. 入力欄にタスクの内容を入力する
2. 入力欄でEnterキーを押して送信する
3. タスクの文字列を取得し、配列に格納
3. todoリストのタスク欄に表示される
HTML,CSSで見た目を作成
html
<div class="todo_box">
    <h1>ToDoリスト</h1>
    <form action="" id="todo_form" name="todo_form">
      <input type="text" id="add" name="task" style="width: 100%;" placeholder="タスクを入力し、Enterキーを押して保存してください">
    </form>
    <div class="tasks">
      <p class="task_title title">タスク</p>
      <ul id="task_ul" class="todo_ul">
     <!--
          <li>
            <input type="checkbox">
            <div>
              <span>タスクの内容</span>
              <a>削除</a>
            </div>
          </li>
   -->
      </ul>
    </div>
  </div>
タスクを表示する要素はjavascriptで作成してulタグの中に入れていきます。
(青色のコメント部分をjavascriptで作成)
css
html,
body {
  margin: 0;
  padding: 0;
}

.todo_box {
  width: 60%;
  max-width: 600px;
  margin: 0 auto;
}

.tasks,
.comps {
  margin: 20px 0;
}

.tasks.close,
.comps.close {
  border-bottom: 1px solid rgba(0,0,0,.36);
}

#add {
  height: 35px;
  background-color: rgba(44,66,118,.06);
  border: none;
  border-radius: 5px;
  padding: 0 15px;
}

#add:focus {
  outline: none;
  border: 1px solid #6495ed;
}

.todo_ul {
  padding: 0;
  margin: 20px 0 0 0;
}

.todo_ul.close {
  max-height: 0;
  overflow: hidden;
}

.title {
  font-size: 15px;
  color: rgba(0,0,0,.36);
  display: none;
  position: relative;
  cursor: pointer;
  margin: 0;
  user-select: none;
}

.title::before {
  width: 5px;
  height: 5px;
  content: '';
  border-bottom: 2px solid rgba(0,0,0,.36);
  border-right: 2px solid rgba(0,0,0,.36);
  transform: rotate(45deg);
  position: absolute;
  top: 7px;
  left: -10px;
}

.title.close::before {
  transform: rotate(-45deg);
}


.todo_ul li{
  list-style: none;
  display: flex;
  align-items: center;
}

.todo_ul input {
  cursor: pointer;
}

.todo_ul div {
  border-bottom: 1px solid rgba(0,0,0,.36);
  width: 100%;
  display: flex;
  height: 40px;
  justify-content: space-between;
  align-items: center;
  padding-left: 10px;
}


.todo_ul a {
  color: rgba(0,0,0,.36);
  text-decoration: none;
  cursor: pointer;
}
現状だと、タイトルとタスクの入力欄のみが表示されます。

JavaScriptでタスク追加機能を作成
javascriptを用いて、タスクを追加する処理を書いていきます。
const todoForm = document.getElementById('todo_form');
const add = document.getElementById('add');


todoForm.addEventListener('submit', (e) => { // 入力された値が送信された時の処理
    e.preventDefault();
    let doMessage = add.value; // 入力された値を取得
    if(doMessage !== '') {
      addTask(doMessage);
    }
    document.todo_form.reset();
});
doMessageの値が空欄ではない時のみ、タスクを追加する処理を実行するようにします。
最後には、reset()メソッドで、入力欄をリセットします。
タスクの追加処理はaddTask()という名称をつけた関数で行います。
const taskUl = document.getElementById('task_ul');
const taskTitle = document.querySelector('.task_title'); //アコーディオンのためのタイトルバー
let tasks = [];  //タスクを配列として保管

function addTask(doMessage) {
    taskTitle.style.display = 'inline-block';
    tasks.push(doMessage); // ①
 //②〜
    let li = document.createElement('li');
    let input = document.createElement('input');
    input.type = "checkbox";
    let div = document.createElement('div');
    let span = document.createElement('span');
    span.innerHTML = doMessage;
    let a = document.createElement('a');
    a.innerHTML = '削除';
    li.appendChild(input);
    li.appendChild(div);
    div.appendChild(span);
    div.appendChild(a);
    taskUl.appendChild(li);
 //〜②
}
関数外でul要素の取得とタスク格納のための配列を用意します。
①部分ではpush()メソッドを用いてタスク内容の文字列を配列に格納しています。
②部分ではタスクを表示するための要素を作成し、配置しています。(青色のコメント部分を作成しています)
<ul id="task_ul" class="todo_ul">
     <!--
          <li>
            <input type="checkbox">
            <div>
              <span>タスクの内容</span>
              <a>削除</a>
            </div>
          </li>
   -->
</ul>
javascript全体は以下のようになります。
const todoForm = document.getElementById('todo_form');
const add = document.getElementById('add');
const taskUl = document.getElementById('task_ul');
const taskTitle = document.querySelector('.task_title');
let tasks = [];

function addTask(doMessage) {
  //タスク要素作成・・・
  taskTitle.style.display = 'inline-block';
  tasks.push(doMessage);
  let li = document.createElement('li');
  let input = document.createElement('input');
  input.type = "checkbox";
  let div = document.createElement('div');
  let span = document.createElement('span');
  span.innerHTML = doMessage;
  let a = document.createElement('a');
  a.innerHTML = '削除';
  li.appendChild(input);
  li.appendChild(div);
  div.appendChild(span);
  div.appendChild(a);
  taskUl.appendChild(li);
  //・・・タスク要素作成
}


todoForm.addEventListener('submit', (e) => {
  e.preventDefault();
  let doMessage = add.value;
  if(doMessage !== '') {
    addTask(doMessage);
  }
  document.todo_form.reset();
});
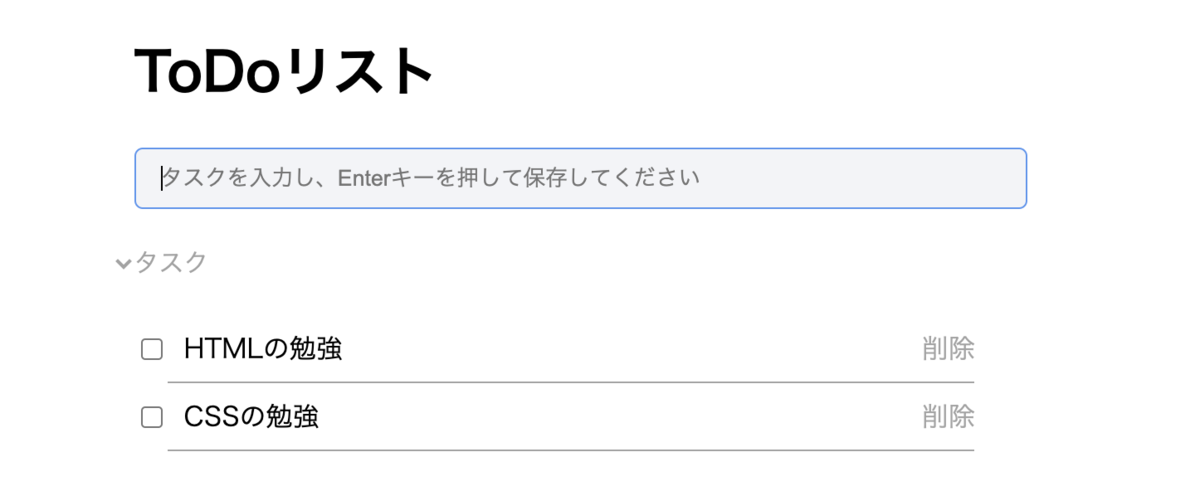
上記のようにプログラムすると以下のようにタスクを追加できます。
メッセージ
次回は削除機能から解説していきたいと思います。
yuu104.hatenablog.com